
Software Selection & Installation
We love going on road trips, however the kids in the back don’t always feel the same way. Traveling anywhere over a couple of hours becomes tricky as there’s only so much colouring they want to do! They, like all of us, are used to watching things on demand.
While streaming services work great at home, they’re not always reliable on the road. Poor mobile coverage, data caps, and battery drain can turn a peaceful trip into a litany of “Are we there yet?” complaints. I decided to build a custom in-car media server that would work reliably, offline, and keep the whole family happy. As there’s only so many times I can attempt to explain buffering and packet loss to a four-year old!
Tip
TL;DR; I chose a MiniPC with an external hard drive. The shopping list is at the end of this article
These days, we’ve become so used to having vast media libraries available at our fingertips, gone are the days of watching whatever was broadcast, or hunting for that specific VHS tape (that inevitably someone put back in the wrong box). The minute we pull out of the driveway, and away from the safety of our home network, reality sets in.
What I needed was a self-contained, always-available media server that could host a subset of our digital library, with a mobile cellular connection as a backup.
For this project, I needed hardware that met three key criteria:
As a bonus, hardware video transcoding support would be ideal.
This platform fulfils the entire list of requirements, It’s small, cheep, uses a few watts of power, and ticks the bonus box, by supporting Intel QuickSync, which provides hardware transcoding.
Note
I purchased a N5105 series platform in 2023, newer platforms are available as of 2025
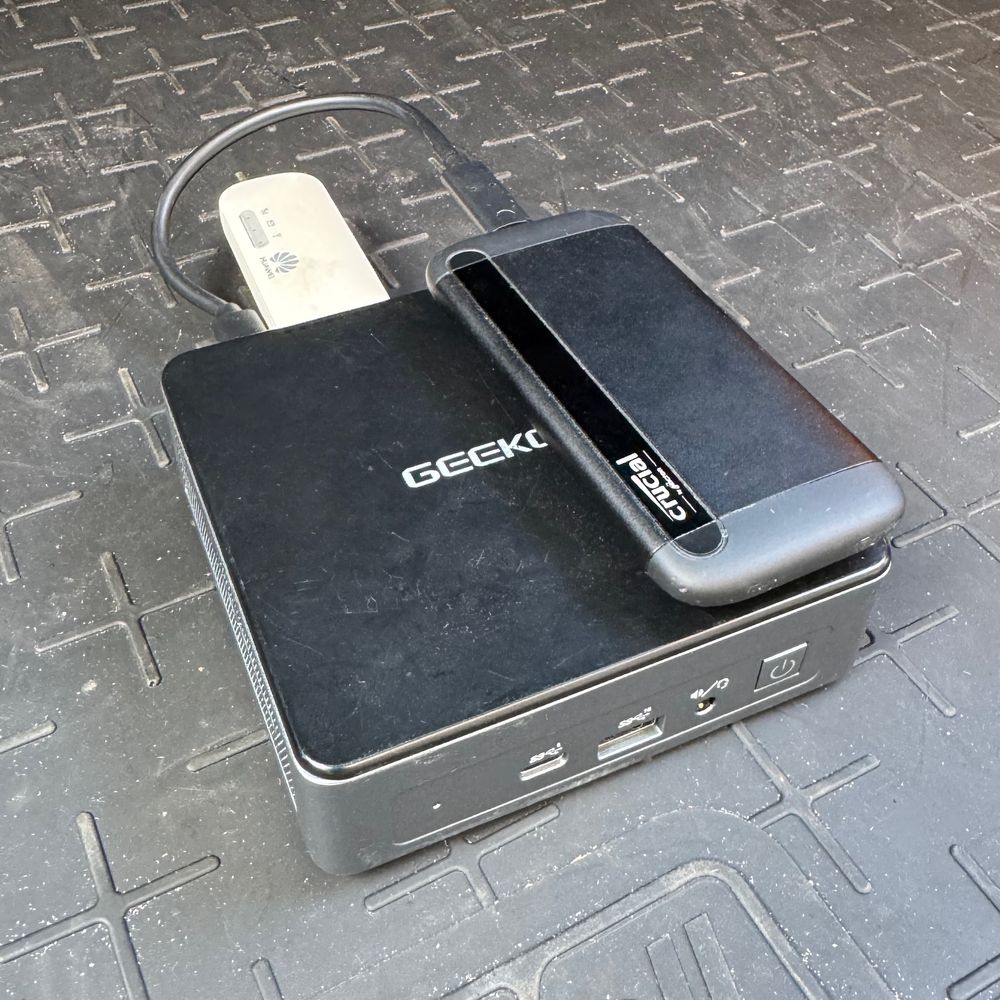
I opted for a GEEKOM MiniAir 11, N5105
While the Raspberry Pi 4 was initially considered, and is an excellent single-board computer. However it doesn’t support hardware video transcoding, meaning all media processing would have to rely on software CPU transcoding, resulting in poor performance.
The built-in 256GB drive provides the operating system and application storage, but isn’t sufficient for a meaningful media library.
I added a Crucial 2TB USB 3.2 (CT2000X8SSD9) external drive to store the actual media files. The external drive can be easily swapped or upgraded as the demand grows, and USB 3.2 Gen-2 provides sufficient bandwidth for multiple concurrent video streams without bottlenecks. Originally my plan was to disconnect the drive, and plug it into my NAS and run a synchronization task, making an external drive ideal. It’s affixed to the top of the MiniPC with a command strip, just to keep the whole package together.
Note
This drive is now end of life, and crucial now offer the CT2000X9SSD9 as a replacement
I had a Huawei E8372h-320 “wingle” from a previous project kicking around, I decided to use this to provide connectivity while on the move. However I would opt for the specific non-wifi version of this dongle, as firstly I don’t need the additional WiFi capability, and secondly I was unable to get this to work in modem-only mode, using the usb_modeswitch as it stands the device is essentially double NAT-ed, (and whatever CG-NAT things the mobile provider does)
Sadly the GEEKOM MiniAir 11, N5105 doesn’t accept 12V power directly, it’s designed around 19V input, as per the Intel design specifications for the platform. It also doesn’t support USB-PD, which also would have been great as any USB-PD rated supply would have been able to provide the correct voltage for the unit.
It comes with a 240V adapter, however for efficiency reasons I wanted to keep the entire system DC, and not introduce an inverter.
Instead we can use a Buck-boost converter, to boost the voltage from 12V up to 19V. Right now the model that I picked up on Amazon isn’t available any more, however any “universal laptop car charger” should do, such as this one from KFD
However since this is tied to the 12V from the car, when the ignition is in the off position the PC will lose power, this is fine for a first iteration and for testing, but we will probably have to introduce an uninterruptible power supply of some type, as I don’t want to have to have the ignition on, and run the car battery down just to run the media server.
We now have the hardware we need to start working on the software side of the implementation. which we’ll be diving into in the next part of this set, setting up the operating system, configuring the media server software, and getting everything talking together. We’ll also dive into the networking configuration to handle both WiFi and mobile connectivity.
Note
Or equivalent, originally I put this together in 2023, and things have moved on. However I still believe that a MiniPC offers more performance per watt then a RaspberryPi 4/5