
Software Selection & Installation
In part one, I talked about the hardware I’d selected, and the reasons for that selection. This time we’re going to walk through the software choices and configuration.
Netplan + NetworkManager + dnsmasq + iptablesFirstly let’s get an OS installed, my go to for home use is Ubuntu LTS, right now the latest LTS is 24.04. Download the Ubuntu Server ISO, and flash it to a USB drive, either through one of the many tools available. However you can use dd to write the iso direct to the block device.
sudo dd if=ubuntu-server.iso of=/dev/sdb bs=1M status=progress
Tip
I’ve made the assumption that this installation isn’t headless, as in, will be connected to a monitor and keyboard. I also found the whole process easier if the machine is connected to a network over ethernet, instead of wirelessly. Even though the expected mode of operation is headless.
Insert the drive into an available USB port, make sure that you’ve had a look in the BIOS and enabled boot from USB Mass Storage.
Follow the installation instructions, I went an installed the minified version of the OS, however with ssh support as I’ll be using it to run the ansible scripts later on. I chose the minified version in order to keep boot times as quick as possible.
Tip
You should probably set a statically assigned IP either through your DHCP server, or via the interface itself, or rely on name resolution. Then add your ssh public key to the server
One of the most complex aspects of this build was creating a reliable network setup that could handle multiple connectivity scenarios:
Note
When I first attempted this, it turns out there was an issue in Ubuntu 22.04 with wpa_supplicant and openssl, regarding insecure renegotiation. Fortunately newer versions of Ubuntu no longer have this configuration issue. As it resulted in many a fruitless google search!
sudo apt-get install -y network-manager dnsmasq iptables iptables-persistent iw
We have to configure NetworkManager to use dnsmasq as the DNS backend.
#/etc/NetworkManager/conf.d/dns.conf
[main]
dns=dnsmasq
NetworkManager then runs it’s own version of dnsmasq, which has it’s own host configuration location, so add the additional host domains there if required.
#/etc/NetworkManager/dnsmasq-shared.d/hosts.conf
address=/.carnet/10.0.67.1
By default fresh installations do not perform packet routing between interfaces, however for our usage, we need to enable this feature. Fortunately it’s a one line change in the /etc/sysctl.conf file to set net.ipv4.ip_forward to 1
#/etc/sysctl.conf
#...
net.ipv4.ip_forward=1
#...
Netplan is Ubuntu’s declarative network configuration tool that uses YAML to define network settings and translates them into configurations for underlying network management systems. Either NetworkManager or networkd.
Netplan made sense to me as it is declarative, and validated before being applied, reducing the risk of applying broken network configuration, also, it can be written out as an artefact, and then applied. No need for multi-step scripts.
The below is the template that’s interpolated and shipped to the server to be applied based on the local ansible configuration, the script that runs this has access to the defined variables to help set up the configuration. Or you can just go ahead and hard code these
lte_modem_interfacewireless_interface_namewireless_ssidwpa_passphrasecidr# /etc/netplan/configuration.yaml
network:
renderer: NetworkManager
ethernets:
enp2s0: # Built in Ethernet
dhcp4: true
optional: true
{{ lte_modem_interface }}:
dhcp4: true
optional: true
wifis:
{{ wireless_interface_name.stdout }}:
dhcp4: true
access-points:
"{{ wireless_ssid }}":
password: "{{ wpa_passphrase }}"
mode: ap
addresses:
- {{ cidr }}
optional: true
version: 2
sudo netplan generate && sudo netplan apply
Warning
When all interfaces are configured as optional: true the boot process can be delayed by up to 120 seconds. This was due to an issue in Ubuntu 22.04, that can be solved by running systemctl disable --now systemd-networkd.service, more information is available in the ticket
In some instances the NetworkManager resolver will interfere with the built in system resolver.
Create a new file in the resolved.conf.d directory
#/etc/systemd/resolved.conf.d/noresolved.conf
[Resolve]
DNSStubListener=yes
Then restart to pick up those configuration changes
sudo systemctl restart systemd-resolve
Finally we need to configure the firewall to allow traffic to transit between the WAN and LAN segments of the network.
-A POSTROUTING -s 10.0.67.0/24 ! -d 10.0.67.0/24 -j MASQUERADE
-A POSTROUTING -o  -j MASQUERADE
-A POSTROUTING -o  -j MASQUERADE
Either append these to your /etc/iptables/rules.4v file, or use the iptables command directly
Note
In order for the firewall information to be persisted between reboots, you must write it to the file
Finally, we’ve configured our network stack, and should now be able to connect clients to the hotspot and get an IP address. The next step is to make sure our drive, that will contain all of our media is accessible.
We’re going to use AutoFS for this part, as it’ll automatically attempt to mount the block device, when the mounted folder is accessed by any process. This is handy as it reduces the boot time, as drive mounting tends to be a blocking operation during the boot phase.
sudo apt-get install exfatprogs autofs lvm2
We need to set up a couple of config files for AutoFS
#/etc/auto.master.d/media.autofs
/media /etc/auto.media
This files tells AutoFS that when you’re inside the /media directory, you should apply the /etc/auto.media config
The next file sets up the actual mount and the configuration options for that mount, there are a couple of ways to identify a USB device, however we’re going to rely on the device UUID which will be different for every device, you can get this information by running lsusb with the device attached.
This file is tab delimited, the first argument is the directory name that is used to trigger the mounting, so in this example accessing /media/external/file will trigger the mounting
The next argument is the -fstype which tells AutoFS what filesystem it’s expecting to mount, and what it’s associated mount options are. In this instance we’re using ExFAT and mounting it in ro which is Read Only mode.
#/etc/auto.media
external    -fstype=exfat,ro   UUID=68F1-B7DE
Then finally restart AutoFS to pick up the config changes
sudo systemctl restart autofs
There were a few options when it came to media servers, from just a Samba share, using a UPnP server, however I wanted the flexibility and rich metadata that a media server provides. The only caveat being that it can’t rely on internet connectivity.
In the end the only real candidate was Jellyfin, Jellyfin is a free and open-source media server, that provides an interface to consume media, as well as manage that media, grabbing subtitles, metadata, keeping track of playback state. It’s also able to perform server side hardware video transcoding.
Jellyfin isn’t available in the Ubuntu default package repositories, but fortunately adding the Jellyfin repo is straightforward.
# Add Jellyfin repository
curl -fsSL https://repo.jellyfin.org/ubuntu/jellyfin_team.gpg.key | sudo gpg --dearmor -o /etc/apt/trusted.gpg.d/jellyfin.gpg

echo "deb [arch=$( dpkg --print-architecture )] https://repo.jellyfin.org/ubuntu $( lsb_release -c -s ) main" | sudo tee /etc/apt/sources.list.d/jellyfin.list

# Install Jellyfin
sudo apt-get update
sudo apt-get install -y jellyfin
The Intel N5105 does support hardware acceleration, however we need to enable the specific hardware flag on the device. Go ahead and grab the linux-firmware package.
sudo apt-get install -y linux-firmware
Then configure the firmware for the i915 driver.
sudo mkdir -p /etc/modprobe.d
sudo sh -c "echo 'options i915 enable_guc=2' >> /etc/modprobe.d/i915.conf"
Then update the initramfs and grub
sudo update-initramfs -u && sudo update-grub
Finally you’ll have to reboot the system to get the driver to load.
The next step is to follow through the general hardware acceleration guide there’s a couple of manual steps, please read through this guide
You should now, once you’re connected to the hotspot, be able to visit the hostname, or the ip address of the server to access the management UI of the Jellyfin server.
http://10.0.67.1:8095
Follow the on screen instructions to get an account set up, you’ll then need to switch into the admin panel and set up some libraries that target the external drive that we configured earlier at /media/external
You’ll also need to set up the hardware transcoding options in the admin panel
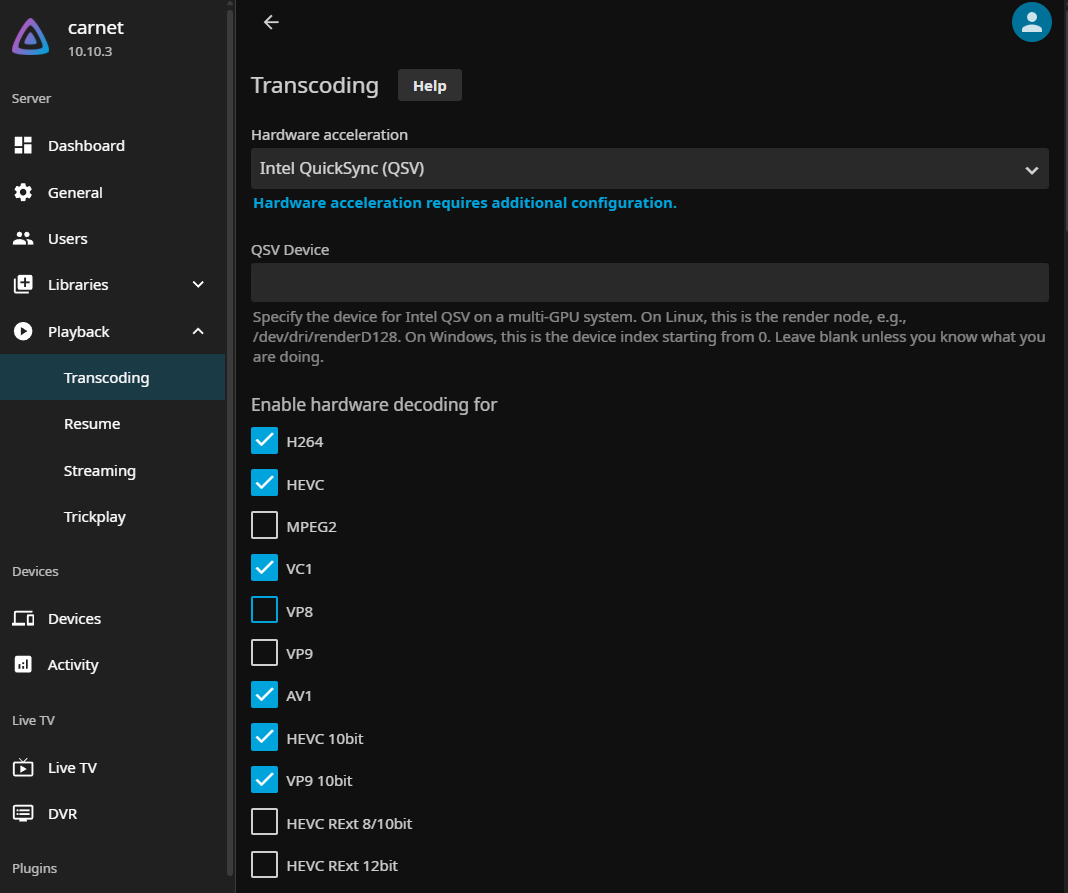
Note
These are the configuration options that worked for me, along with enabling the low-power H.264 and HEVC encoder. Your mileage may vary.
By now we have a wireless hotspot configured, an external hard drive connected and automatically mounted on demand along with hardware transcoding. The next steps are actually using this in anger, running it in the car, and the inevitable issues that I’m sure will necessitate a part 3. We’re planning on driving to Italy for our summer holidays this year, so hopefully that kind of distance will give it a good test. I’ll report back with the results!